Prepare a workspace for Massive Simulation in Windows
To run SCANeR on an HPC/Cloud architecture (or within container solutions like Docker, Kubernetes, etc.) you need to customize the SCANeR workspace in order to prepare it to run without server X11 (i.e. without a graphical interface).
The good news is, we have all you need 👍🏻
You simply need to configure your SCANeR environment to fit your needs and IT infrastructure.
In this guide you will see
- Step 1. Setup essentials SCANeR modules for Massive Simulation
- Step 2. Activate non-real-time simulation
Step 1. Setup essential SCANeR modules for Massive Simulation
In our case we create a SCANeR workspace named SAMPLE_COMPUTE_LOCAL. (how ?)
The default modules are the ones using X11 server, such as:
-
VISUALorURENDERER: driver view -
ACQUISITION: cockpit commands -
OFFLINESCHEDULER: simulation orchestrator
Remove VISUAL or URENDERER
To run SCANeR without X11 server you need to remove SCANeR modules which require X11 server: VISUAL, URENDERER.
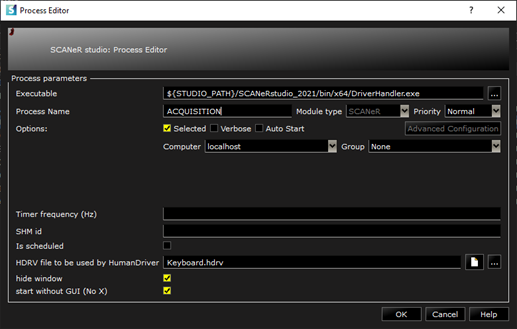
ACQUISITION
SCANeR ACQUISITION module is available in two modes: with or without GUI.
Let’s make sure than that it is set in non-GUI mode.
To do so, edit the ACQUISITION module and make sure that the following both options are checked: hide window, start without GUI (no X)

SENSORS ?
Depending on your test case you’ll need to add other modules such as:
- AD/ADAS:
SENSORS,LASERMETER,CAMERASENSOR,GPSSENSOR, etc. - Headlights:
NIGHTTESTMANAGER,AFSMANAGER, etc. - Etc.
In this guide, we’ll use a dummy system under test: SUT_AEB.
SUT_AEB module is a custom program we made with the help of the SCANeR SDK.
More about How to evaluate and validate an ADAS here.
As the name suggests, SUT_AEB behaves as an AEB.
It will use a radar sensors output, managed by the standard module SENSORS.
Let’s add the modules SUT_AEB and SENSORS to the configuration SAMPLE_COMPUTE_LOCAL.
OFFLINESCHEDULER
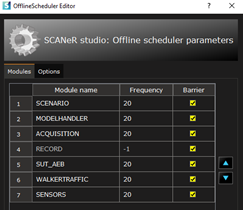
The OFFLINESCHEDULER is an orchestrator; it enables the control of SCANeR modules’ execution step by step.
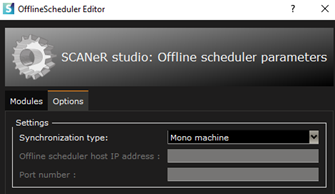
Edit its settings and make sure that the step period and the synchronization is appropriate.
In our case the step period is 50 ms (1/20 Hz)

The synchronization method is Mono machine

Confirm
Your SCANeR workspace SAMPLE_COMPUTE_LOCAL should now looks like this

Step 2. Activate non-real-time simulation
This step is easy and fast!
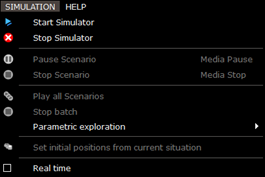
In order to inform the SCANeR environment that the orchestrator is the OFFLINESCHEDULER, we need to disable Real time mode.
To do so, from the main GUI of SCANeR studio, click on the SIMULATION menu button and uncheck the Real time option.

Your SCANeR workspace is now all set!