How to evaluate and validate an ADAS system
This guide explains how to interface your ADAS system with SCANeR studio.
This tutorial requires the Foundation and AD/ADAS packs. If you don’t have them already, get your Trial version of SCANeR and follow this walk-through.
The Samples Pack includes example ADAS already interfaced to SCANeR:
- SAMPLE_ADAS_AEB: I recommend this one for an easy to understand example to refer to along this guide.
- SAMPLE_ADAS_LKA_ACC: A more comprehensive example with driver inputs and dashboard.
- SAMPLE_LATERAL_CTRL &* SAMPLE_LONGI_CTRL: Focus on each available level of control: speed, acceleration, pedals, steering wheel.
Principle
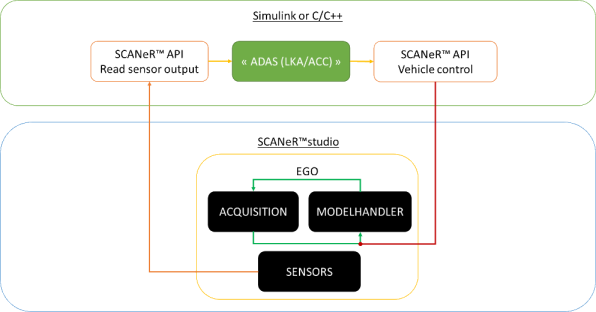
SCANeR studio hosts the vehicle model, sensors and the interfaces that allow the connection to your ADAS model.
The SCANeR API is the interface. It enables the reading of the vehicle status, driver inputs and sensors outputs.
For the current tutorial, we are going to focus on a simple Automated Emergency Braking (AEB) situation. The brakes should be activated when a pedetrian is detected too close in front of the EGO vehicle.
We will need
- Step 1. A sensor model
- Step 2. A scenario with Ego car and pedestrian
- Step 3. The ADAS model
Before starting, create a dedicated workspace called TUTO_ADAS for instance.
Step 1. Sensor
Functional sensor model
In this step, we will use the radar sensor functional model (L1).
Note: SCANeR functional models are part of the AD/ADAS Pack. They use simulation logical content and 3D world models to determine a sensor’s outputs. These are perfect models returning perfect targets’ list. You can add noise to simulate signal perturbation. SCANeR functional models are made for you if you want to focus on the ADAS system itself or effortlessly simulate any of the 6 Levels of Vehicle Autonomy.
If you want to focus on sensor processing, check out our Physics Based Sensors Pack.
")
SCANeR comes with a set of example sensor models to help you to begin.
To view and edit existing sensor models go to RESOURCES panel > Sensors tab.
We will use aLongRangeRadarSensor as a template for our sensor model.
- Right click on
LongRangeRadarSensorand selectEdit as new.... TheSave sensor as...GUI appears - Save your new radar model as
LRRS1(xml format). TheSensor model editionGUI appearsNote: We advise using the same sensor model name as the market name, so you can find it easily later on.
This dialog enables the control of any sensor’s parameters as a beam (e.g. quantity, shape, range, etc.).
Let’s add a Pedestrian mobile obstacle to the detection capabilities.
- Click on
Edit Targets, checkPedestrianand click onOK. - Click on
Save and closeto get back to SCANeR studio supervision view.
Your LRRS1 radar model is ready and available from SCANeR resources ![]()
Sensor Module
During the simulation, the radar sensor model is managed by the module SENSORS.
- Add the module to your configuration with
menu CONFIGURATION>Configuration manager>Add Process>SENSORS>Add. - Then
Closethe Add Process window,Applythe new configuration settings and leave withOK.
Step 2. Scenario
In this step, we will design our experiment by defining the environment (the proving ground), the actors, the sensors, the story and the KPI/Metrics we would like to get for post-analysis.
We will use default models included in SCANeR:
- Environment/Proving ground: Community
- Actors: Ego vehicle (CALLAS SmallFamilyCar), Pedestrian (Kid_Boy_02)
- Sensor: LRRS1
- Story: The Ego vehicle will be equiped with the LRRS1 model and will be driven by a virtual driver at a continuous speed of 50kmh. Kid_Boy_02 will be deactivated by default. When the Ego vehicle is less than 20 meters from Kid_Boy_02, the ADAS model will activate and force Kid_Boy_02 to cross the road without paying attention.
- Create a new scenario.
Go tomenu FILE>New Scenario, selectCommunityenvironment and click onOK - Add an Ego vehicle.
FindRESOURCES panel>Vehicles tab>Cars (Callas)>SmallFamilyCarand drag and drop it onto a straight road in the main view. - Add a pedestrian
Find
RESOURCES panel>Pedestrians tab>Kid_Boy_02and drag and drop it onto the sidewalk, about 50 meters ahead of the Ego vehicle.
Ego’s driver
By default, CALLAS vehicles are driven by a Human Driver (using the keyboard, game controller or simulator). In order to add some repeatability, we will change to Virtual Driver.
Note: A Virtual Driver acts similar to a Human Driver by using the vehicles inputs (pedals, steering wheel, …), but they are automated. The Virtual Driver can be asked to follow specific trajectory and speed. It strictly follows the inputs it is given, and nothing else.
An Autonomous Driver would follow traffic rules by simulating realistic human driving behavior. It would stop upon seeing the pedestrian on the road, and our ADAS wouldn’t be triggered. Although it is possible to configure this human driving emulation at a high level (to disable the attention to pedestrian, for instance), it does not offer as much control as a Virtual Driver. So for this example we prefer Virtual Driver.
We want to force our Virtual Driver to follow a straight line at a speed of 50 kmph.
- In the main view, right click on the Ego vehicle >
Edit instance.... - From the
Drivertab, setTypefield value toVirtual driver (automatic). - From sub-tab
Steering wheel controlsetSteering inputfield toStraight line. - From sub-tab
Longitudinal controlsetPedals controlfield toFollow a speed target specified in the command data. - From sub-tab
Command datasectionCommand type/Point by pointclick onEdit. - Fill-in the command table as follow (Leave all other cells empty).
| Time(s) | Speed (km/h) | Gearbox ratio | |
|---|---|---|---|
| 1 | 0 | 50 | 1 |
| 2 | 60 | 50 | 1 |
- Click on
OKto closeCommand type\Point by pointedition and click onOKagain to apply changes and close instance edition.
Ego’s sensor configuration
Earlier we defined a sensor model “LRRS1”. We can now attach it to the car, at a specified position on the front bumper.
- Find
RESOURCES panel>Sensors tab>LRRS1and drag and drop it on the Ego vehicle in the main view. - SCANeR will ask you to create a sensors’ configuration on this Vehicle. Aswer
Yes. TheSensor configuraiton editionGUI appears.Note: A sensor’s configuration is a set of sensor models to attach on a vehicle. From this dialog you’ll be able to define each sensor’s position/orientation, outputs, etc.
- Set Position X to 3.5 m
- Set Position Z to 0.5 m
Note: The vehicle dimensions diagram at the bottom of the window helps to find this position.
- Click on
Save and close. TheSave sensor configuration as...GUI appears. - Save as
SmallFamilyCar_AEByour new sensor’s configuration (xml format). The sensor’s configuration including LRRS1 is now linked toSmallFamilyCarNote: Since each vehicle model has its own dimensions we can assume that a sensor’s configuration will be dedicated to a specific vehicle model. So we advise including the name of your vehicle in the sensor configuration’s name.
Pedestrian’s activation
The pedestrian should not move until the Ego vehicle within 20 meters. In order to force the pedestrian to stay put, we should deactivate it.
- In the main view, right click on the pedestrian >
Edit instance.... - In tab
Vehicle, setStatusfield value toInactiveand clickOK.Note: Status Inactive means the pedestrian will not move, but is still part of the simulation and will be detected by the sensors. Invisible on the other hand, would remove the pedestrian from the simulation until it is switched back to Inactive or Active.
Pedestrian crossing
The pedestrian should start moving, and cross the road when the Ego vehicle gets closer than 20 meters. A combination of a Trigger and Scripting will allow us to do that.
Start by setting up the trigger.
- Find
RESSOURCES panel>TrafficTools tab>Trigger - Drag and drop a Trigger onto the road ahead of the Ego vechile, about 30 meters before the pedestrian. (That will leave time for the pedestrian to start walking on the road before the car reaches the 20 meter distance, triggering the AEB.
Now we can add the scripting rule: IF Ego drives on Trigger THEN activate Pedestrian AND Pedestrian crosses the road.
- Create a new MICE script
-
SCENARIOS panel>Stodyboard>right click>Add step - Under the newly created step:
Scripts>right click>Add Mice script - Double-cick on
Script 0to open the script edition window (main view)
-
- Create the pedestrian crossing rule
- On the Script editor’s master node
Script 0, right click andInsert Rule - On the newly created Rule title, right click and
Insert Condition.... The Condition selection window opens- Select category
Triggeron the left and functionisTriggeredByVehicleon the right. - Click
OKto insert the Condition. The condition parameters window opens. - The parameter
Triggeris the name of your trigger object. Since there is only one in the scenario, the value is already correct. - The parameter
Vehicleshould be the name of the Ego vehicle. - The
Condition parameter>Typecan be set toBECOMES TRUENote: As a best practice, this makes sure that the Rule is activated only once when Ego drives on the Trigger. If we leave
IS TRUE, the Rule will be activated at every simulation step where the car is still on the Trigger (of non-zero length). By usingBECOMES TRUE, the rule is only activated on the rising edge. - Click
OKto confirm the parameters and close the window.
- Select category
- On the same rule title, right click and
Insert THEN Action.- Select category
State and physical characteristics of the vehicleon the left and functionsetActivationon the right. - Click
OKto insert the Action. The action parameters window opens. - The parameter
Vehicleshould be the name of the pedestrian. SelectKid_Boy_02in the drop-down menu. - The parameter
Stateshould beON, as we want to get the pedetrian out of the Inactive state. - Click
OKto confirm the parameters and close the window.
- Select category
- On the same rule title again, right click and
Insert THEN Action.- Select category
Pedestrianon the left and functionpedestrianCrossRoadon the right. - Click
OKto insert the Action. The action parameters window opens. - The parameter
Vehicleshould be the name of the pedestrian. SelectKid_Boy_02in the drop-down. - The parameter
Useless parameteris legacy and should be ignored. - The parameter
Crossing anglecan be left to90degrees for a trajectory perpendicular to the road axis. - Click
OKto confirm the parameters and close the window.
- Select category
- On the Script editor’s master node
Well done, the scenario is ready !
If you want to try the scenario at this stage, launch the MODELHANDLER (for Ego), ACQUISITION (for Virtual Driver), PEDESTRIANTRAFFIC (for the Pedestrian), SCENARIO (for the script) and TRAFFIC (for the Trigger) modules. Then start the simulation. You will see that the car drives strictly at 50 kmph. When it reaches the Trigger, the Pedestrian crosses the road. Eventually, the Ego vehicle collides with the pedestrian.
Now by connecting the AEB, we can avoid the collision.
Step 3. ADAS model
To implement the ADAS model, we will develop a SCANeR custom module. Such module uses the SCANeR API to read from and write to the SCANeR simulation data buses: Network and Shared Memory.
Note: The current demostration is using C++, but the same can be done with any other programming interface like Simulink, Python, etc…
C++ project
SCANeR API projects should be compiled with Microsoft Visual Studio C++ 2019
You can initialize the C++ project with the following SDK package.
%STUDIO_PATH%\SCANeRstudio_2023/APIs/bin/x64/vs2019/**SCANeR_API_C.2023.dll**%STUDIO_PATH%\SCANeRstudio_2023/APIs/lib/x64/vs2019/**SCANeR_API_C.lib**%STUDIO_PATH%\SCANeRstudio_2023/APIs/include/ScanerAPI/**scanerAPI_DLL_C.h**
Note: For ease of use, we recommend to clone the SCANeR API sample projects that can be found in
%STUDIO_PATH%/SCANeRstudio_2023/APIs/samples/complete.slnwith Visual Studio 2019. For the current purpose,%STUDIO_PATH%/SCANeRstudio_2023/APIs/samples/ScanerAPI/SampleCom/Radar/scanerAPISampleRadar.vcxprojis a good candidate to duplicate and start modifying.
Note: For demonstration purpose, we will include the simulation data interface and the simple AEB algorithm in the same project code. But for a larger project, we recommend dividing the project in two parts: the interface (SCANeR API) and the algorithm.
Declare interfaces
The first step is to declare the interface handles to SCANeR simulation data. This is to be done once at the launch of the custom module.
The ADAS model takes inputs from and outputs to SCANeR:
- Input: distance to collision
- Output: pression on the brake pedal
// read access to radar and ExportChannel
DataInterface* radar_300000 = Com_declareInputData(NETWORK_ISENSOR_SENSORMOVABLETARGETS, 300000); //connect to "ISensor/SensorMovableTargets" with radar ID 300000 (default number for the first
// write access to Shared Memory for longitudinal control
DataInterface* CabToModelCorrective_0	= Com_declareOutputData(SHM_MODELCABIN_CABTOMODELCORRECTIVE, 0); //connect to "ModelCabin/CabToModelCorrective" of vehicle ID 0 (Ego)
**Note: ** The manual documents
Network.htmlandShared Memoryfound under theHELPmenu of SCANeR lists all the available messages. Use it to find the name of the message that you need.
Network and Shared Memory act and are use in the same way. But Shared Memory messages are only exchanged on the same computer, when Network messages can be exchanged on any computer of the simulator’s network.
- The Radar ID is set to 300000 because this is the default ID of the first radar sensor added to the scenario. To confirm your radar ID in SCANeR, check the
Sensors instances and process assignationmenu

Read & write
Now the values can actually be read from and written to SCANeR simulation buses using the handles. This is typically done in a main loop.
short targetsCount = Com_getShortData(radar_300000, "targetsArrayCount"); //read member "targetsArrayCount" of "ISensor/SensorMovableTargets"
if (targetsCount > 0)
{
  char distanceToCollisionTmp[50];
  sprintf_s(distanceToCollisionTmp, "targetsArray[%d]/distanceToCollision", Com_getShortData(radar_300000, "nearestTarget"));
  distanceToCollision = Com_getFloatData(radar_300000, distanceToCollisionTmp);
}
Frame
//scaner project includes
#include "scanerAPI/scanerAPI_DLL_C.h"
#include "scanerAPI/ScanerAPImessagesNetwork.h"
#include "scanerAPI/ScanerAPImessagesShm.h"

int main(int argc, char* argv[])
{
  Process_Init(argc, argv);
  APIProcessState status = PS_DAEMON;

  /* INITIALIZE HERE */

  while (status != PS_DEAD) // main loop
  {
    Process_Wait(); // syncrhonization
    Process_Run(); // step

    status = Process_GetState();

    if (status == PS_RUNNING) // simulation is running
    {
      /* RUN HERE */
    }
  }
  Process_Close();
}
Conclusion
Congratulations on connecting your ADAS model.
Here are some suggestions to customize and enhance the sample:
- Configure driver’s inputs: select your own commands to drive
- Define metrics: design your own Key Performance Indicators